Thursday, March 27, 2014

Birthday Daffodils; a plant dye tutorial

I love daffodils.
To me they mean the start of spring,
a new year,
my birthday,
and now my wedding (almost a year ago now!!)
(photo credit: Serendipity Photography)

Last week I grabbed 4 bunches at the store so they would be ready 
later in the week for dyeing.
 
Lately my brain has been exploding more than usual with the endless plant dyes that are all around me. 

Back in.... well many moons ago, 
I tried dyeing with my birthday daffodils. 
for the first time.
I cooked up the stem and all
ending up with kind of a 
silvery color
and I was SO excited because it was the first time I tried such an experiment. 

I've been pouring over India Flint's book that has a section on 
flower ice dyes. 
Curious, I took a look and got very excited about using violas this summer! 
I'm planning on having flower boxes with violas and other things so it's really fun to be thinking of using them after they start to pass, for dyes.

I was encouraged with India's book to tuck the blossoms away in a zip lock bag in the freezer 
until I'm ready to use them.
Works perfectly for my life. 
There they sat next to the top of my wedding cake 
that I've been nibbling for a year:)

Before I put the flowers in the freezer, 
I weighed each blossom
out of curiosity-
2grams each.

I saved these 16 grams for this silk bundle. 
I them spritzed it with vinegar
and added two rusty nails.

I started to roll it up

but then got an idea...
I noticed the fennel ferns I'd been saving 
to just this very thing 
or something similar
so I added those 
before rolling it all up.

I spritzed it with more vinegar 
before finding a place to smoosh it 
for a while
to encourage the dye 
to work its way into the fabric. 

I've since found a better place.
The cast iron kettle behind our wood stove. 
It works beautifully really flattening them out. 
The one on the left is this bundle here. Look how dark just after two days!
The other two are bundles I'm reworking with California bay leaf and eucalyptus.

I can't wait to un wrap all these!! 

Back to the daffodil dyeing... 
in this here pot are 60 grams of daffodils. 
I pre soaked the yarns and two pieces of silk. 
One piece of silk and one skein of
wool were both premordanted 
with alum. 

The other piece of silk and other skein were not mordanted. 

 I let the pot heat up very slowly because I was concerned
about the temperature getting too high and 
affecting the color. 

Because I had tried this before and ended up 
with such a non-exciting color
(at the time it was exciting because it was something)

Here's my final result after letting the fiber sit in the pot
cooling over night.  
The top two small skeins are:
on the left- no mordant
on the right- alum

The larger skein is from the 2nd bath.
I'm so so happy with how YELLOW this came out! 
I'm so pleased.  

There was still dye left over
but this time I removed the soggy blossoms 
that were still in tack
and made a bundle.

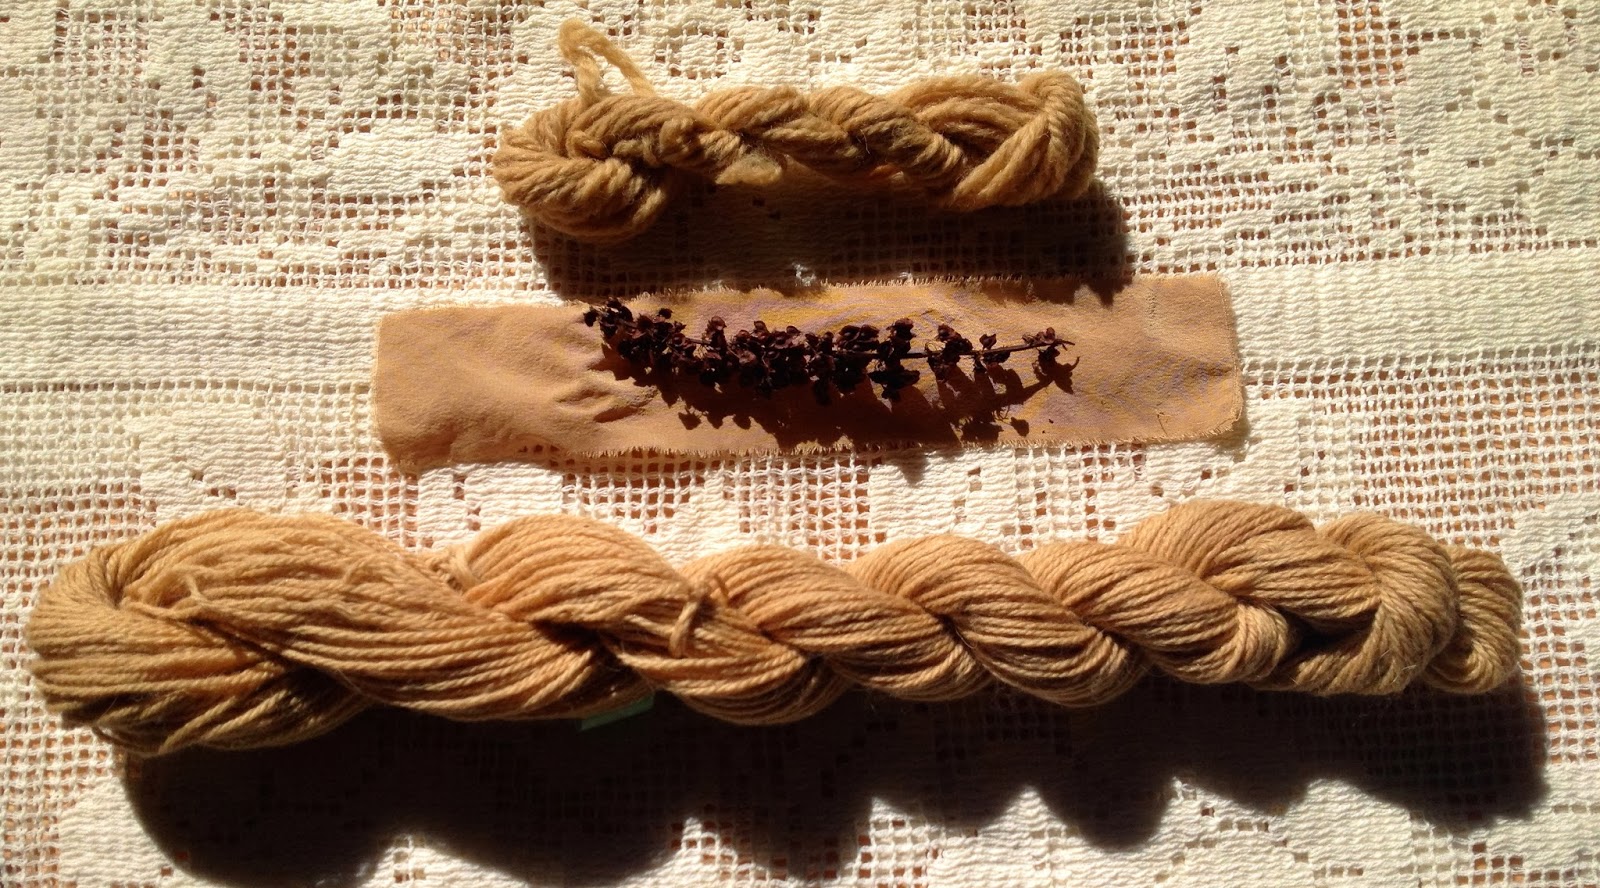
I also added these Zinfandel shamrocks that I just discovered.  

bundle made with vintage cotton calico 
then spritzed with vinegar.

I still had lots left over so I put together a second one
this time on silk fabric
and a few browning 
basil leaves
(btw- if your growing a basil plant indoors-always harvest the tops. It helps it grow better- opposed to the larger leaves on the bottom. 

More on the bundling in another post:)

ok- so remember I had a 3rd dye bath
I added this light blue skein on 
a mohair blend
that I picked up in a tiny whole in the wall
knitting shop in Waterford, Ireland. 


Here are a few of the items that I dyed over the last few days. 
Including this lovely minty green skein 
which is the light blue skein 
over dyed with the 3rd bath of daffodils:) 


Last fall we planted many daffodil bulbs in the yard. 
And several weeks ago, I got the ones I 
couldn't get in the ground-
into pots around the house. 

They are now started to poke up through 
and I look forward to putting them in the ground.

Someday.

Until then, I'm enjoying what I find at the market 
and taking full advantage. 


Check out my etsy shop 
I'm running a little sale
now through the weekend. 
Enjoy!

Today I turned 36 (!!@#(&#^@*@!!) 
It's ok really, 
I'm off to spend the day at my favorite fiber shop
get my hair done
& then
I'll have dinner out
with my sweetheart

It's gonna be a great day. 


Wednesday, March 26, 2014

Shibori Bubbles & Lace Dyeing

So it's 10:21 on a Sunday evening.
I am determined to start getting up earlier (than I have been) in order to make better use of the day. 
we'll see how it goes. 
But for tonight, I've been prepping for my Monday dye day. 
I need to come up with a fancier name than
Monday Dye Day though. But that's what I do on Mondays.
Dye

This May (it will be here before we know it) 
I'll be teaching a 4th class in my series of 
here in
Portland.

Last week I picked up the piece of lovely silk fabric from Mary 
at 
Z Fabrics.
where the 2nd part of Natural Dyeing for sewers will be held. 

Tonight I'm prepping the cloth so that it can soak over night. 

I used linen string but you could use any strong, yarn or rubber bands.
I also used button but I usually use rocks from the road.
I love the organic shapes they make.


I thought a bit about what design to do on the scarf for the class sample. 
I thought about doing something fun with a needle and thread to create binding and wavy lines.
But you know, again I went for the bubbles. 
I LOVE creating round bubble like shapes with shibori
and in my watercolors. 

There is just something about circles, bubbles, and the general roundness of objects that I am drawn to. 
Maybe it's because I've got some of that going on myself. General roundness here and there. 
It's ok, I like my roundness and I'm proud of it.

I also opted to use up an old cochineal/ acetate dye bath
that was occupying my shelf since July.

I kind of couldn't get over how red it still was.
I had about a gallon and a quarter in various containers.
Acetate is a mordant recommended to use with plant based fibers.
But I didn't hesitate to use in on the silk.
I wanted to use up what I had and I wanted to see what would happen.
 (the reflection here in the pot is funny- not something I noticed until just now)

This was just after 5 minutes of being in the bath.

I cooked it very slowly and for a few hours with temp reaching
about 160-180 over the course of a few hours.

I let it sit in the pot over night and
in the morning, I hung it up over the sink so
all it could drip back into the pot.
When it was dryer, I tried soaking it in the sink
but so much dye was coming out.
After a few rinses
I changed course and brought the fabric down to the washer.
That's right, I thew it in the wash with a little
sprinkle of my home made laundry soup.
Which I love.

I was little started with how much it lightened up,
but, it's still beautiful.

Having still more dye left in the pot, 
I added this shirt I thrifted.
I have a thing with lace. 
If you haven't noticed. 

Again, it's lighter then I imagined but 
it's still lovely.
Just a few shades pink.
It will headed to my etsy shop next month:) 

I went ahead and added fiber to a 3rd bath (really a 4th if we count the 1st one in July.

What I've got here:
white Maine Finn wool
yak/silk roving
soy silk
silk hankie
irish texel wool i dyed with indigo
I also threw in some skeins of brown wool.

They are sill hanging out in the dye pot.
I'll up date how the turned out
here.

I love using up dyes but it's often I always underestimate
how much I will be dyeing.
I never quite know how far a dye bath will go until I get through the first one.

That's one of my favorite things about natural dye baths
is stretching it further and further.
Especially when they are plants that I find
unlike this pot which was cochineal extract.

Monday, March 17, 2014

Happy St. Patricks Day; a natural rainbow dye tutorial

When I was very small I used to say that Rainbow was my favorite color. 
Or depending on how I felt, I'd also say Clear. 
I was fascinated with both features that I found in my paint box, my barbies' clothes, my Rainbow Bright doll and the stuffed butterfly I had. 

Also since I was small, I always associated rainbows with Ireland and Ireland with rainbows. 
The first time I actually saw a rainbow in Ireland,
 I was experiencing The Burren for the first. 
Seeing those magical colors soar up and through the grey blue sky over Kinvara
the world around me was illuminated even further. 
Standing at Dunguaire Castle with the other tourists, 
gazing out over Galway Bay's low tide. 
I swear the seaweed rose up and sang with happiness because it was practically glowing. 

Sigh... I knew I was destined to return to that area. 
And I did 3 more times.
But more on that later. 

One day last week, I played around with color blending with my natural dye powders 
to create a rainbow self striping yarn for one of my up coming 
And a sampling of the rainbow spectrum
using only 3 dye pots that featured the 3 primary colors. 


I used:
and 


After I dyed up my samples for the knitting class example Judy has made,
I played around with creating a rainbow self striping skien. 

I love how it turned out! 

I'll try and lay out the basic movements I did to achieve the secondary colors.

for the rainbow skien:
Pictures it: your yarn wrapped in a skein. Eyeball it in thirds. 

Start with indigo 
(because in my experience with the vat I have going- it has rite color remover in it which is the same as theoria dioxide- If I dye fiber in another color first and then dip in this indigo vat- it strips the color and then adds indigo.... not my idea of a good time)

So with that said- I always dye with indigo first. 
I dipped a third of my skein in this first. 
I left it for about 15 minutes. 
I pulled it out holding it with the blue downwards and let it drip in the pot for a few minutes as it oxidized from white to yellow to green to blue.
I then gently squeezed the yarn so it wouldn't drip in the next pot. 

I then placed another third in the madder root pot AND set up another small pot right next to the burner with a jar inside- just trying to create a sort of stand. You can use anything though. 
It's important to let the yarn NOT in the dye pot be higher up than what is in the dye pot. 
Otherwise, water will travel up the yarn and find the outlet, pouring all over your stove. 
I also let 1/3 of the blue soak in the madder bath to create purple. 
I had let the yarn sit in the madder for about 20-30 minutes before I pulled it out. 
Again, I gently squeezed only enough to not let it seep into the osage which was my next step.

With the osage, I dipped both the remaining undyed 1/3 AND 1/3 of the other end of the blue- to make green and 1/3 of the madder that was right next to the osage into the osage to create orange. 
One might think this takes a bit of math- but I like to think it takes visualization.

When all is said and done with this dyeing portion, you will end up with;
1/6 red- (madder root)
1/6 orange (osage + madder)
1/6 yellow (osage)
1/6 green (osage + indigo)
1/6 blue (indigo)
1/6 purple (indigo + madder)

You can use many other blending variations to achieve the tones that you like most. 

I'm excited to continue my experimenting with these pigments. 
Many of these results will be for sale in my etsy shop. For example :) 

Alternatively, if you want to create a single color like green, orange or purple with your natural dyes,
follow the color combos above or create your own with whatever makes those same colors. 
For example, you could use indigo + fustic to create green. 
Logwood grey + osage or fustic to create green, 
and so on. 

As far as that magical rainbow skein, I re-skeined it to shuffle my colors:) 
A fun trick to apply to any of your hand painted, dip, space, or vat dyed yarns. 

Thanks for reading and please let me know if you have any questions or comments by leaving a comment here. 
I love hearing from you. 

Sláinte!


Saturday, March 8, 2014

An Anonymous Red Weed in My Dye Pot

I know it's been TOO long since my last dye tutorial. 
I had set a goal (that I was really enjoying) of dyeing at least once a week and posting a tutorial for you. It's amazing to me how doing something out of my normal routine had flip everything on it's head. 
This thing that got me out of my dyeing routine was a really good thing though. 
One of my favorite things to do with my husband. 
We visit his family and friends and I get to smell fresh things growing 
that I can't smell here in Maine in February. 
Ok so that was almost a month ago now 
and between the jet lag and tending to other things 
including my husband and I spending a lot of time rethinking our food habits-
we both participated in a 4 day liver cleanse to help reset our bodies. 
It was very effective and I may chatter about it here and there. 

With this New Year, 
I set a few goals for myself 
including mapping out 
and scheduling my creative time. 

That includes spending more time with my dye pots 
and plants studies. 
I don't know about you, 
but I can get side tracked- 
by anything so easily. 

Before I know it, the day is over 
and I haven't created or accomplished anything that I wanted to.
So, when I can, all my thoughts and ideas that I have 
when I wake, just before bed, in the shower, on walks, mid day- when ever, 
I try and write as many of them down. 
Then I revisit these scratchy lists 
and map out how much time I'll need and any materials I need to fetch or prepare. 

I then write it all down with a pencil on a tangible calendar- my iphone is useless for this exercise because I want to see everything at once. 
I can't tell you what scheduling these creative activities has done for me. It feels so good to plan and keep me pointed in the right direction. 

I knew I wanted to get back to my dye tutorials 
but like I can do so easily, 
I get distracted by everything else around me that needs to get done. 
Plus, since we returned home, I didn't have a good creative plan in place where I could just pick up.
I had to start from scratch.
And I was distracted by several household items to clear out. 

I was also having trouble deciding what to dye up next. 
While clearing out the mudroom, I came across these nameless red weeds
that I found in the organic apple orchard last fall. 
I've looked in books and the internet and I cannot figure out what these tall rusty red weeds are
but
I used them anyway. 


As they were steeping away in the water, slowly heating up, I noticed these beautiful seeds peeking through like tiny bright red pin pricks. 
I hadn't noticed them when I picked the plant last fall. 

The dye bath was a golden color. 
Normally, I may have let the fiber float around with the plant because I really enjoy the color variation that occurs when plant is touching fiber as it cooks away. 
But I knew with this plant it would be a disaster to get all those fine seeds out of my fine yarn.

I let the small strip of silk swim in there with the plant materials. 
After a few hours of simmering, I used my fine mess strainer and removed the plants saving the bath. 
I then put in my yarns and let it simmer away for about an hour. 
I did add a tiny bit of alum to the dye bath and cream of tartar- after it was cooking away. 


The first skein on the top is 100% wool
the large skein on the bottom is a blend of merino, angora and silk (!)

I may dip this in an indigo vat to create an earthy green
an logwood bath for an EVEN earthier green
or
my madder/ cochineal after bath for an earthy orange. 

*Remember*

in your dye experiments, when you get a result that your not impressed with, dip it into something else for over lapping colors. The depth of color we are able to achieve through natural dyes is (in my opinion) something that cannot be obtained with acid dyes. 
The pigments in natural dyes, to me, are still alive and this is the very reason why I LOVE using them. 

I think next time, I'll collect this plant and try an eco print. 
For all you natural dyers out there who also love to collect plants, 
I highly recommend playing with this method. 
It is fun and magical 
and gives a whole new definition to natural dyeing. 

Last night I unfolded 6 prints I put together while on my last trip to SF.
I was tickled with the results but I was hoping for more.
Later today I'll be adding to them and will share pics later :)

Stay tuned for next week when I post a natural rainbow dye tutorial
for St. Patrick's Day. 
<3 nbsp="" p="">

p.s. if you know the name of this weed, please share in the comments:)