Showing posts with label natural dyes. Show all posts

Monday, September 5, 2016

Purple Pansy Dye; a solar method

It feels SO GOOD to get back into my solar dyeing experiments. 
I was rummaging through my excess of pre-mordanted samples the other day just to see what I needed more of in order to plan for next spring. 
Now with a toddler, planning is everything.
I don't have everything available that I'd like mordanted but I realized I shouldn't let it stop me. 
I had been dead heading my purple pansies in my studio window boxes all spring and summer- though lately I've been letting them go. 

I also set up two other jars of fern and one of that dark red weed I've talked about before. I'll get to those later. 

In the past I have simply placed my petals in the freezer until I had the amount I wanted. But this time I thought it would be simpler and work just the same to let them dry, because really they just get darker. 

I weighed out my fiber group in grams and the same with my dried petals. I had half the amount of petals as I did fiber.
I wetted out my fibers for an hour or so, placed them in the jar with tap water, placed the petals onto the top of the fiber and filled the rest with just near boiled water. 

This pic is just after it was set up, next to the fern jar. 


Under an hour color started to appear through the jar and the fibers started to change. 
I LOVE working with pansies. 
I do believe it's time for the black pansies to be out in nurseries....


I let it go a few days and then pulled it all out to give things a good squeeze and inspection. And then I put everything back. 

Behind are my tansy and lobster mushroom dyed on maine shetland skeins.
They are available here.


Here everything is looking more on the dark purple grey side. 
But I waited even longer.
I went away for the weekend and came back to find the yarns were a darker green...
So I decided to try a little experimenting with ammonia and vinegar. 
Or rather, ph adjustments. I was shocked at what I found. 

I poured a little of the pansy dye into two jars, just an 1" tall. 
In one I dripped in some ammonia which brings up the ph (and I'm really sorry! I never actually checked with my papers! I was very in the moment and wasn't thinking critically). 
The dye bath was a very dark purple. But with the ammonia is shifted to forest green. It was SO cool! Must get better pictures next time. 

In the other jar I dripped in some vinegar and it shifted to magenta. 

In each I dipped in the fibers at one end and then the other. 
The ammonia had more of a striking effect, especially on the wool and cotton- at first. The vinegar seemed to have done nothing at all to change the colors on the fibers. 


Here they are dried. 
The group to the left with the dark skein first is kid mohair/ silk mordanted in an iron liquor, then partly dipped in ammonia after. It has strikes of green through the dark grey blue. 
Skien of alpaca mordanted with alum came out light grey blue with a bright strike of chartreuse. 
Last skein in group is also alpaca mordanted in a copper liquor. Less effect for both dye and ammonia dips. The clothes on top are silk mordanted with alum. And cotton mordanted with alum. 

Btw- I prepared these samples over a year ago now and I've decided since that doing just a copper liquor isn't very effective. Now when I prepare my samples, I only do alum and iron for wool and silk. And only acetate and tannin for cotton and linen. 

The middle group is wool mordanted with alum and dipped in ammonia. 
Cotton mordanted with copper liquor, ammonia dip. 
Silk I think alum mordanted dipped one half in ammonia and the other half in vinegar. 

The last group to the right with the dark strip of cloth is alpaca mordanted with iron (kind of hiding under the wool). Wool mordanted with iron, ammonia dip. The cotton mordanted with copper and silk mordanted with iron. 


My purpose for these exercises in dyeing is to find what I like best. In this case I like the iron mordanted on silk best. And if I do this again, I'll remember to use at least 50% of petals to weight of fiber or more. I also loved the mohair and silk blend also mordanted with iron. 

Solar dyeing is one of my favorite things to do! 


Wednesday, August 31, 2016

Dyeing with Lobster Mushrooms

I'll never forget the first time I spotted these odd bright orange shapes peaking up through the pine needles 3 years ago. 

In 2013 was enjoying my 4th year teaching at the New England Fiber Arts Retreat in Washington, Maine and I had only just heard about dyeing with mushrooms. 
While on a walk I spotted these brightly colored clumps and brought them back to camp for my foraging class. 
As a group we looked them up and found immediately some good info on how to dye with them.
It was a fun impromptu surprise for us all. 
Along with just alum mordanted wool you get a pale orange. With a splash of ammonia the dye bath goes alkaline (ph goes up) and more corals come out. 

This was a fun picture to take this year as I was just arriving. I took last year off as I had a 6 week old babe. So returning this year was EXTRA special and sweet. That moment when I was walking up the road and seeing everyone for the first time made my heart almost explode with joy. 


Anyway,
after locating more this year, (I love how dry they all ready are) I planned a project for my shop yarns. 

Though best used at a 1:1 or higher mushroom to fiber ratio, I think I did use more fiber to mushroom. I really wanted to dye 2 skeins at once as that's what I like to do for my shop, to have at least 2 skeins in the same color way. I had about 4oz of whole mushrooms, also from the help of my dear friend Alissa Allen who found me a few and who reminded me of the tips around ammonia. We were blessed to have Alissa join us for a 2nd year at the retreat to teach her mushroom dyes!! 


I did try to shave the orange bits away from the mushroom as underneath they are white. But it was just too hard and time consuming. And as I was doing this during nap time, it had to be quick. 


I let my yarns simmer for an hour or so keeping an eye on the temp and then took it off the heat until morning. The color was ok, a paler orange but I wanted to shift it into a pinker tone. I pulled out the yarns and splashed in some ammonia and put the yarns back in for a dip. Maybe 15 minutes or so. I learned the hard way in the past not to heat wool in an ammonia bath as it quickly hardens the wool. And as I was dyeing my handspun shetland, I needed to get this just right. 


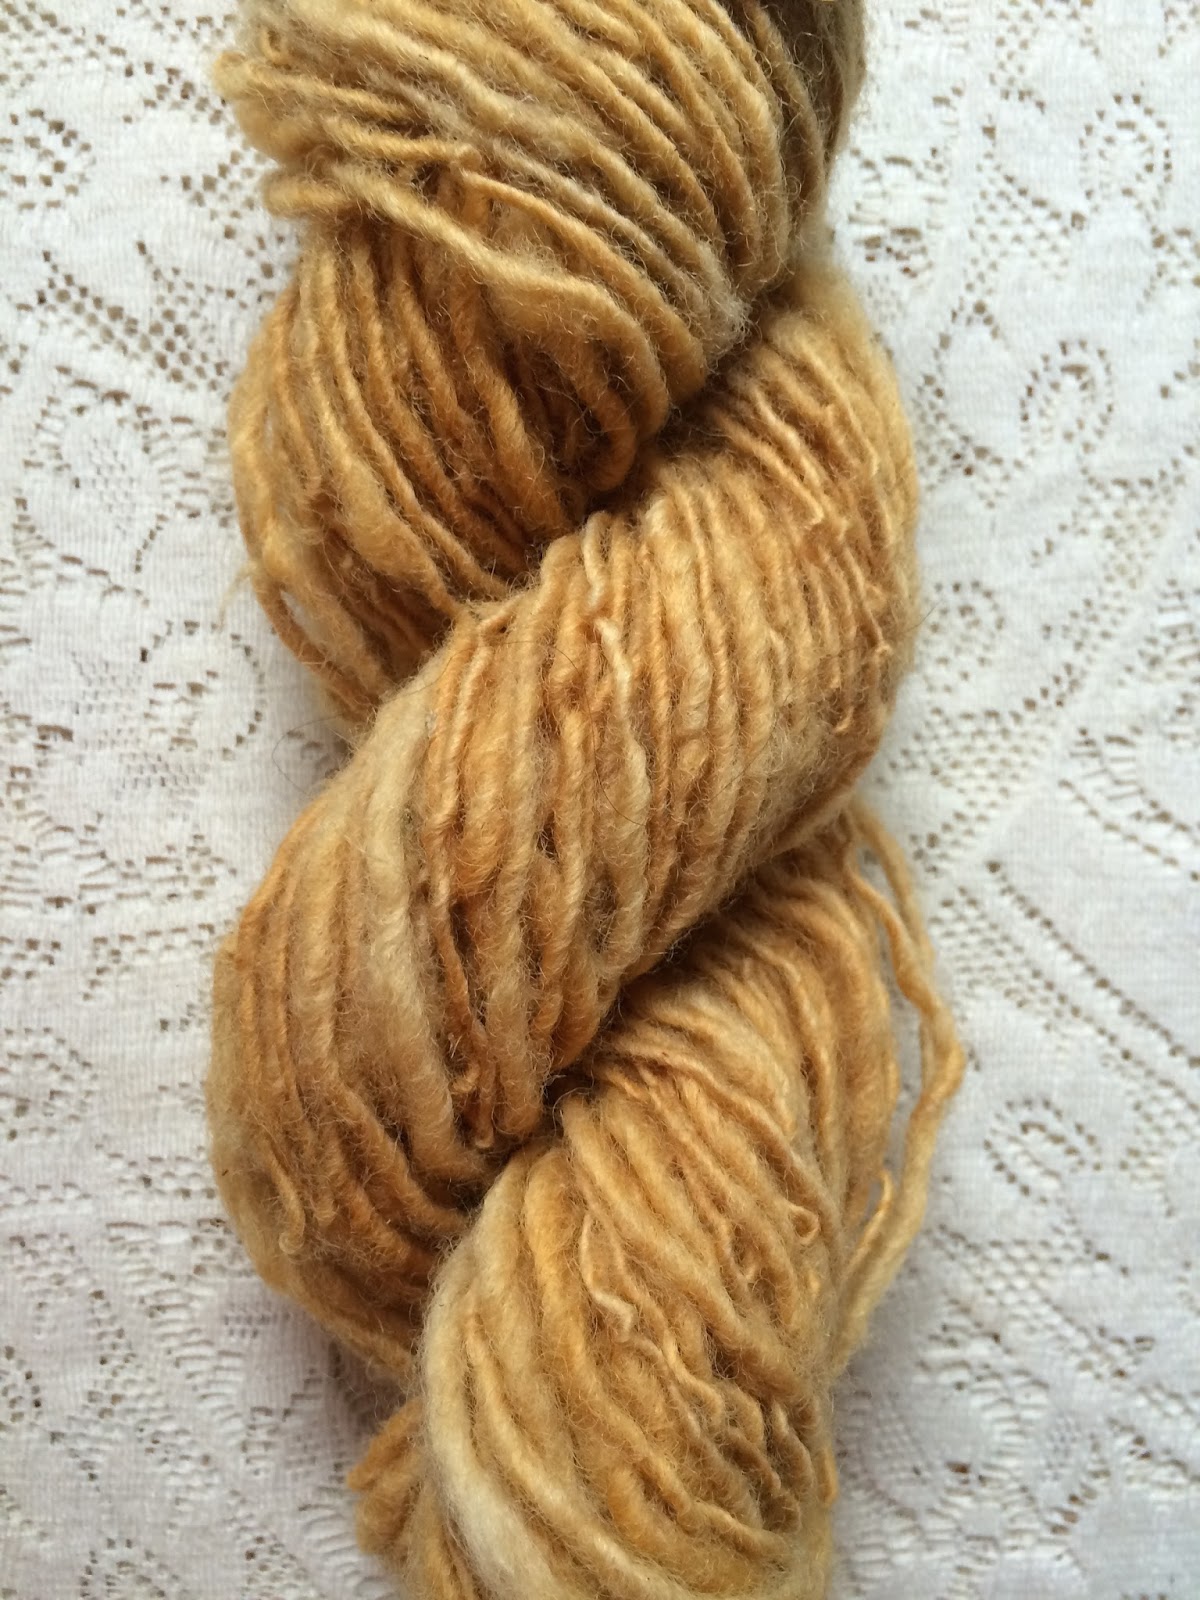
The color did shift to a slightly more red orange. The above picture is when it's wet. Bottom picture is dried and is now listed in my etsy shop
Also above pic shows my tansy dyed yarns which you will also see here and which I will be writing about next and my purple pansy solar dye which I will also be writing about. 


Have you used lobster mushrooms before? It's of my of favorite mushrooms to use. Maybe next time I'll find a better solution to peeling the orange off and get a really good stock pile built up for deeper oranges and magentas. Oh the possibilities!! 


Monday, August 3, 2015

2015 Summer Collection; the process behind my obsession, making yarn from scratch.

It's been what feels like 
FOREVER!!!
Since I had enough time and mental energy to write something here.
However, I've been growing a baby.
And on June 14th, he arrived. 
Which was 3 weeks and 3 days, 
early.

Our little guy has kept us quite busy and we are just so in love. 
And some how, miraclously, I have been able to accomplish the occasional knitting
and dyeing. 
All due to his long naps and my husband having time off from work. 

The day before my water broke, I spent it outside in my make shift dye studio moving basicly like a turtle. 
It was the most active I had been in a few months I think. 
The next morning my water broke (which woke me up) and two days later, I was holding my baby. 

When I retuned home almost a week later, I discovered I still had several skeins soaking in dye pots. 
The Rosehips in particular benefited from this 8 day soak the most. The color held fast during my wash and light tests. 


Beautiful peach color. 

It didn't take me long to recognize that dyeing and fiber work slipped in nicely with caring for our little one. 
For dyeing I need only about 1/2 hour chunks of time to set things up. I can let pots simmer away checking on them occasionally and then switching them off about an hour later and let them sit for a day or more. 

Same goes for all my fiber prep. 

And speaking of, that's what I wanted to share with you, 
how I get it all done.

From fleece to yarn.

First, I start by going to the Maine Fiber Folic, Common Ground Fair or volunterring with sheep farmers to skirt fleeces in exchange for fleece. 

I collect anywhere from 5-10 raw fleeces over the course of the year.  
Focusing on Icelandics, Shetlands, Finn, and Cheviot mixes which come from an island in the Penobscot bay. 
I'm very picking about the fleeces I choose and want to choose them myself and in person so I can smell them and unfold the entire fleece for inspection before bringing it home. 

Once I get them home, I skirt the fleece on my porch and then let it soak is batches in my double kitchen sink with the hottest water and orvis paste. The wool goes through several rinses until the water comes clean. I hang the fleece to dry on hangers and then on the cloth line outside. If I'm doing this is the winter I hang the fleece to dry above the woodstove. 

Then working one fleece at time, I weigh it out in bundles of 4 ounces and using my Fancy Kitty drum carder, (I just love that name!) I card up bat after bat to then be spun. Once the whole fleece is cardered, I stuff it all back into it's bag and start carding the next. I've had my carder for a whole year now and I just love it. It's a double wide and it was a very reasonal cost. Because it's just me doing this whole operation and I only sell from Etsy right now, I work really hard to keep my costs low and my work sustainble. I was very pleased that I could use money I made fro teaching dye classes to purchase this item. 

When all fleeces are cardered, I then start the process of spinning. Using my Kromski spinning wheel that I've owned for 11 years now, I mostly like to spin these primitive breed wools into singles variying from aran to sport weight. I rarely ply but it does happen. 


This summer I read about how to mordant wool with alum in a cold soak. I was over joyed at this item because I knew it would save me time, energy, and butane. I have a very large pot- way to big for my stove or my burners. I set it up outside, filled it up with the garden hose, desloved 10% alum with boiling water and added this to my pot. I then added my wetted out yarns and let them sit for 24 hours. Mordanting done. 

I will admit, I was slightly skeptucal that it would work and it was a bit deal to try it on such a project. But it did work and I highly recommend trying this next time you want to save on time and energy. 

When I everything was ready to dye, I really had no plan for colors. The really wonderful thing about natural dyes is that if you dye something and it's not strong enough or you don't like it, you can over dye it and it will be beautiful. 

I'm someone who both collects too much stuff which clutters my life and I love to get rid of stuff and organized. I really don't like it when things hang around too long. As I was setting up shop and getting highly organized for this 37 skein dye adventure, I discovered I had several buckets full of old dye baths from a year ago. Cochineal, jewelweed, and indigo. I also had some frozen plants last year I dug out of of larger freezer. It felt so great to use everything up. 


I was so pleased with these pastel but bright colors. They are layers of old cochineal, jewelweed, indigo, frozen rosehips, goldenrod. And the purple at the bottom is my Umbilicaria lichen. I had such a great time moving through my colors and wool slowly. 

After each skein cooked in the pot for an hour or two, I turned off the heat and let it sit for 1-2 days. I then hung them out on my front porch to dry- right in full sun so I was able to see if any fading would happen. I then rinsed each skein in a Mrs. Meyers soapy solution and rinsed a few times to get any top color off. The deep madder however was very tricky and some still remains. 


This picture does not do the colors justice, especially the yellows which really are quite lovely. 

Though I've sold out of a few colors already, you can view more for purchase at mt etsy shop, 44Clovers

I do hope to write more in the near future about more of my creative adventures. I'm also planning more workshops, so stay tuned and thanks for stopping by. 

I love making yarn. 


Saturday, April 5, 2014

Tea Dyes; experimenting w/ 8 teas

This week my dye day was focused on teas for dyes. 
Lately I've been working with this beautiful kid mohair and silk blend yarn from Itlay. 
One of my favorites. 
I thought I do a really simple test with some various teas.
Planning for this experiement, I knew I wanted to use cheap tea
so I headed to the Christmas Tree Shop. 
Found two bozes or of different varieties. 

Becase I wanted to test each flavor by itself but all at the same time, 
I set uo this double boiler method which works great and I often use when 
conducting other sample dye experiments. 

I taped the tea bags on the cupboard in the same order they were in the pot
so I wouldn't loose track. Some of the tea bag labels simply said 
"herbal tea" which wasn't any help to me.


There was no mordant used as black teas have a nartual occuring 

I let the jars sit in the steaming pot for about an hour,
then turned off the burner. 


I was really really hoping for the herbal dyes to give me more
but the black leaf Irish and English teas are lovely and rich.
Especially on the mohair/silk:) 

With each jar went in a tiny sample yarn that was presoaked/soured
and one tea bag.
If I do this again with say the pomegranite and raspberry, 
I'd like to experiment with 
premordanted yarn,
possibly doing a vinegar dip
and/or adding a few more tea bags
beacuse the tea made from it is 
SO RED!

Still I love the soft colors against the white. 
A really simple and fun experiement
and a fun things to do wtih your kids at home
your students in school
and could be a great one to do this summer 
with a solar/ sun tea method. 

for example- buy a box of cheap red berry tea of any flavor,
get out your large sun tea jar (if you have one) or any container.
dye your child's dress, shirt, nightie, any clothes of your own
or table linens
and let it sit in the sun tea for a few days:)


After they all dried, I gave them a little rinse (beacuse they were a little crispy)
and the yarn fluffed back up after drying and the colro didn't change. 

The Irish Breakfast Tea is my favorite color here by the way. 

P.S. you could also try this with your Easter Eggs this year.
My next post will be a tutorial about dyeing with veggie scraps and creating Latvian Easter Eggs. 

Happy Spring 
oxox

Monday, March 17, 2014

Happy St. Patricks Day; a natural rainbow dye tutorial

When I was very small I used to say that Rainbow was my favorite color. 
Or depending on how I felt, I'd also say Clear. 
I was fascinated with both features that I found in my paint box, my barbies' clothes, my Rainbow Bright doll and the stuffed butterfly I had. 

Also since I was small, I always associated rainbows with Ireland and Ireland with rainbows. 
The first time I actually saw a rainbow in Ireland,
 I was experiencing The Burren for the first. 
Seeing those magical colors soar up and through the grey blue sky over Kinvara
the world around me was illuminated even further. 
Standing at Dunguaire Castle with the other tourists, 
gazing out over Galway Bay's low tide. 
I swear the seaweed rose up and sang with happiness because it was practically glowing. 

Sigh... I knew I was destined to return to that area. 
And I did 3 more times.
But more on that later. 

One day last week, I played around with color blending with my natural dye powders 
to create a rainbow self striping yarn for one of my up coming 
And a sampling of the rainbow spectrum
using only 3 dye pots that featured the 3 primary colors. 


I used:
and 


After I dyed up my samples for the knitting class example Judy has made,
I played around with creating a rainbow self striping skien. 

I love how it turned out! 

I'll try and lay out the basic movements I did to achieve the secondary colors.

for the rainbow skien:
Pictures it: your yarn wrapped in a skein. Eyeball it in thirds. 

Start with indigo 
(because in my experience with the vat I have going- it has rite color remover in it which is the same as theoria dioxide- If I dye fiber in another color first and then dip in this indigo vat- it strips the color and then adds indigo.... not my idea of a good time)

So with that said- I always dye with indigo first. 
I dipped a third of my skein in this first. 
I left it for about 15 minutes. 
I pulled it out holding it with the blue downwards and let it drip in the pot for a few minutes as it oxidized from white to yellow to green to blue.
I then gently squeezed the yarn so it wouldn't drip in the next pot. 

I then placed another third in the madder root pot AND set up another small pot right next to the burner with a jar inside- just trying to create a sort of stand. You can use anything though. 
It's important to let the yarn NOT in the dye pot be higher up than what is in the dye pot. 
Otherwise, water will travel up the yarn and find the outlet, pouring all over your stove. 
I also let 1/3 of the blue soak in the madder bath to create purple. 
I had let the yarn sit in the madder for about 20-30 minutes before I pulled it out. 
Again, I gently squeezed only enough to not let it seep into the osage which was my next step.

With the osage, I dipped both the remaining undyed 1/3 AND 1/3 of the other end of the blue- to make green and 1/3 of the madder that was right next to the osage into the osage to create orange. 
One might think this takes a bit of math- but I like to think it takes visualization.

When all is said and done with this dyeing portion, you will end up with;
1/6 red- (madder root)
1/6 orange (osage + madder)
1/6 yellow (osage)
1/6 green (osage + indigo)
1/6 blue (indigo)
1/6 purple (indigo + madder)

You can use many other blending variations to achieve the tones that you like most. 

I'm excited to continue my experimenting with these pigments. 
Many of these results will be for sale in my etsy shop. For example :) 

Alternatively, if you want to create a single color like green, orange or purple with your natural dyes,
follow the color combos above or create your own with whatever makes those same colors. 
For example, you could use indigo + fustic to create green. 
Logwood grey + osage or fustic to create green, 
and so on. 

As far as that magical rainbow skein, I re-skeined it to shuffle my colors:) 
A fun trick to apply to any of your hand painted, dip, space, or vat dyed yarns. 

Thanks for reading and please let me know if you have any questions or comments by leaving a comment here. 
I love hearing from you. 

Sláinte!


Saturday, March 8, 2014

An Anonymous Red Weed in My Dye Pot

I know it's been TOO long since my last dye tutorial. 
I had set a goal (that I was really enjoying) of dyeing at least once a week and posting a tutorial for you. It's amazing to me how doing something out of my normal routine had flip everything on it's head. 
This thing that got me out of my dyeing routine was a really good thing though. 
One of my favorite things to do with my husband. 
We visit his family and friends and I get to smell fresh things growing 
that I can't smell here in Maine in February. 
Ok so that was almost a month ago now 
and between the jet lag and tending to other things 
including my husband and I spending a lot of time rethinking our food habits-
we both participated in a 4 day liver cleanse to help reset our bodies. 
It was very effective and I may chatter about it here and there. 

With this New Year, 
I set a few goals for myself 
including mapping out 
and scheduling my creative time. 

That includes spending more time with my dye pots 
and plants studies. 
I don't know about you, 
but I can get side tracked- 
by anything so easily. 

Before I know it, the day is over 
and I haven't created or accomplished anything that I wanted to.
So, when I can, all my thoughts and ideas that I have 
when I wake, just before bed, in the shower, on walks, mid day- when ever, 
I try and write as many of them down. 
Then I revisit these scratchy lists 
and map out how much time I'll need and any materials I need to fetch or prepare. 

I then write it all down with a pencil on a tangible calendar- my iphone is useless for this exercise because I want to see everything at once. 
I can't tell you what scheduling these creative activities has done for me. It feels so good to plan and keep me pointed in the right direction. 

I knew I wanted to get back to my dye tutorials 
but like I can do so easily, 
I get distracted by everything else around me that needs to get done. 
Plus, since we returned home, I didn't have a good creative plan in place where I could just pick up.
I had to start from scratch.
And I was distracted by several household items to clear out. 

I was also having trouble deciding what to dye up next. 
While clearing out the mudroom, I came across these nameless red weeds
that I found in the organic apple orchard last fall. 
I've looked in books and the internet and I cannot figure out what these tall rusty red weeds are
but
I used them anyway. 


As they were steeping away in the water, slowly heating up, I noticed these beautiful seeds peeking through like tiny bright red pin pricks. 
I hadn't noticed them when I picked the plant last fall. 

The dye bath was a golden color. 
Normally, I may have let the fiber float around with the plant because I really enjoy the color variation that occurs when plant is touching fiber as it cooks away. 
But I knew with this plant it would be a disaster to get all those fine seeds out of my fine yarn.

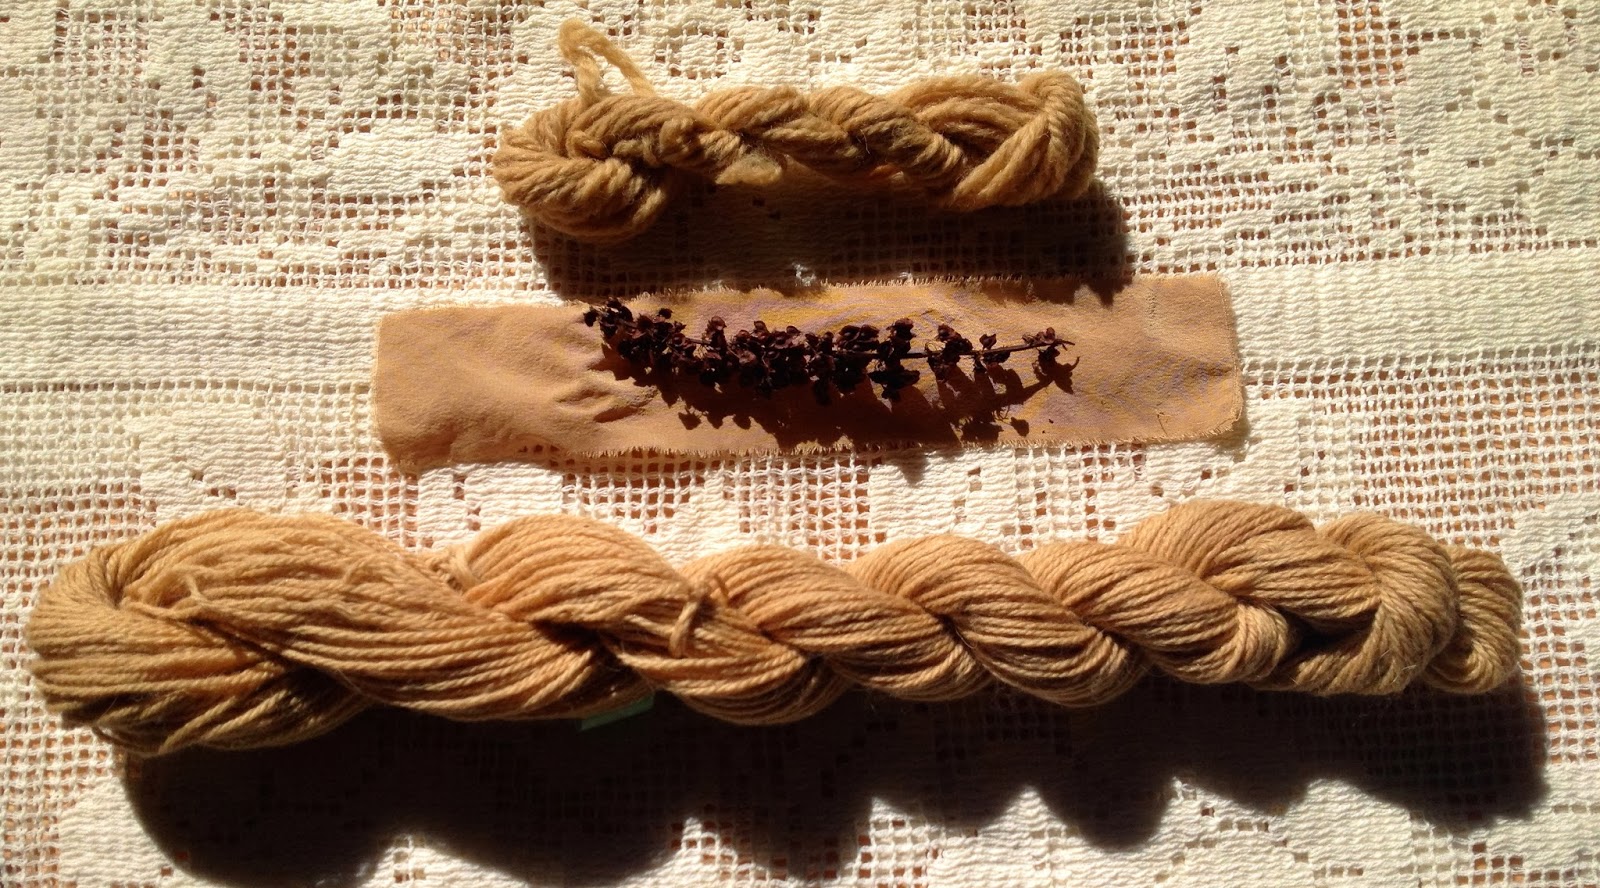
I let the small strip of silk swim in there with the plant materials. 
After a few hours of simmering, I used my fine mess strainer and removed the plants saving the bath. 
I then put in my yarns and let it simmer away for about an hour. 
I did add a tiny bit of alum to the dye bath and cream of tartar- after it was cooking away. 


The first skein on the top is 100% wool
the large skein on the bottom is a blend of merino, angora and silk (!)

I may dip this in an indigo vat to create an earthy green
an logwood bath for an EVEN earthier green
or
my madder/ cochineal after bath for an earthy orange. 

*Remember*

in your dye experiments, when you get a result that your not impressed with, dip it into something else for over lapping colors. The depth of color we are able to achieve through natural dyes is (in my opinion) something that cannot be obtained with acid dyes. 
The pigments in natural dyes, to me, are still alive and this is the very reason why I LOVE using them. 

I think next time, I'll collect this plant and try an eco print. 
For all you natural dyers out there who also love to collect plants, 
I highly recommend playing with this method. 
It is fun and magical 
and gives a whole new definition to natural dyeing. 

Last night I unfolded 6 prints I put together while on my last trip to SF.
I was tickled with the results but I was hoping for more.
Later today I'll be adding to them and will share pics later :)

Stay tuned for next week when I post a natural rainbow dye tutorial
for St. Patrick's Day. 
<3 nbsp="" p="">

p.s. if you know the name of this weed, please share in the comments:)


Wednesday, February 5, 2014

A day with my mushrooms; dye experiments

I've been collecting road side plants for a while now. Always curious about the little inconspicuous plants that jump out at me on my walks.  

This past summer while walking up from my first swim at Medomak, I spotted along the side of the woods, two large bright orange- things popping out from the leaves. 
At closer look I notice these bright growths are mushrooms. 
Something happens when I find a new mushroom, lichen or plant where I don't know it's potential yet. I become a crazed person, stopping everything, using what ever I have on my person, shirt, skirt, (in that moment) towel that I usually wear around my middle after swimming to cover parts I don't care for others to see. Like my glow in the dark thighs. 
But once I saw this orange- time stopped and I stopped thinking of my whiter than pale thighs. I was more happy about my weird mushrooms. 
After some investigating, I found it was the lobster claw mushroom. Also known as
 Hypomyces lactifluorum. Dyeing with this fresh mushroom and adding ammonia to the dye bath, our yarns came out a light salmon pink. I was pretty excited about it. As the summer progressed into fall, my mushroom foraging grew to such an obsession. I spent a lot of time in my sister's new woods in Bowdoin where my two small nephews and niece helped me collect, filing my basket full of every mushroom they found. 

Back home I sorted each batch, cutting them into tiny pieces and letting them hang out outside to dry or in my basement. I did invest in an inexpensive dehydrator to help get the job down quicker. It speeds up the process for drying. Drying the mushrooms is essential for storing for later use. 

This week I knew would be the week to go through my stash. Over this past year I managed to stuff TWO plastic grocery bags FULL of dried foraged mushrooms. All labeled with the date, location, and if I was able to identify it- the name. If not- I made one up. But you know, it just feels better to know with out a doubt what a mushroom is. I still need to find a good mushroom book. 

After I decided on which ones to work with, I weighed each pile, in grams, made notes, put them in a mason jar, filled with boiling water, placed in large lobster pot filled half way with water. I made a little note of which mushroom on a piece of masking tape, stuck it on the end of a wooden skewer and put it in the jar. I love to multi task and I don't feel normal if I'm not multitasking, but I also can't hold all this info at the same time. I have to write things down. Also, having these notes is always good for comparison later with each dye test. 

Measuring out & grinding hard black puff balls. 


Red gilled cort bath- beginning

Lobster claw bath

First look at red gilled bath!!!

From left to right: a type of black hedgehog, 4 baths of lobster, 2 of red gilled. All in process. 

A few days before the mushroom dyeing, I mordanted several small sample skeins of 100% wool and small strips of silk fabric. In each jar went a strip of silk and a skein of wool yarn. 

Bright spots in a sea of beige. 


When I'm dyeing with a plant for the first time and I'm waiting and I'm exited to see the color result, I've had to teach myself not to really "look" at the color until it's all done and dried on the fiber. 

Mushrooms I dyed with: (if it has a * I made up the name because I can't figure out what it is yet)
Red Gilled- 5g
Lavender (looks like cortnilius)8g
hard black puff balls 5g
hedgehogs- black 23g
phalis 12g
cort 2g
lobster claw 2g
polypore 19g
Nov- mushroom 35g
thelephora terrestris11g
tiny soft puff ball 5g
white fungus with pink edges 41g
tiny orange hedgehogs 2g
turkey tail 14g
pail turkey tail 20g
small poly pore 20g

I knew the red gilled and the lobster where absolute givers of color- the others where blind experiments. 

Those two mushrooms- the red gilled cort and lobster where just stunning. STUNNING! STUNNING! STUNNING!
It's official. Though red gilled is wonderful, the 5 grams I used only lasted through 4 dye baths where the 2 grams of lobster claw mushroom lasted through 6! The first dye bath of lobster with just alum was bright orange. I then added ammonia for the next dye baths and lovely pinks. 

Have you dyed with mushrooms? Share your stories with us here!

About to board a plane to San Francisco where I'll have 8 days to explore Califonria's spring and budding flora and fauna. 
I've got collection bags & silk fabric packed for creating Eco prints! So excited to discover more dyes plants!

If I remember to, I'll post to FB at 44 clovers, Pinterest and Instagram my findings along the way:) 

Happy Weekend!

Wednesday, January 15, 2014

A Story of 3 Lichens; a tutorial in lichen dye experimentation

“I find myself inspecting little granules as it were on the bark of trees little shields or apothecia springing from a thallus such is the mood of my mind and I call it studying…"
Thoreau

I’m not sure when I first fell in love with lichens. Not just an appreciation for these tiny leafy growths, but a deep curiosity that has lead me down a path of reverence for what lichens are, how they grow, how they contribute to our planet, and the secrets they hold inside their thin layers. Through this investigative process of finding the pinks, reds and purple that some lichens hold, it has been an adventure like no other. 

One day in my studio apartment where I lived in Portland's East End, I had a small bag of branches I found with leafy lichens attached. I took the lichen off the branch, popped them into my vintage crock pot, and covered with water. I turned it on high and let it cook away for over two hours. The smell was like the best woodsy smell I remembered from my childhood springs. The color was that of root beer. I strained out the lichens and saved the bath. I slipped in some pre-wetted wool and let it cook away some more. The resulting color was a lovely soft brown, like a nuthatch. And the smell… smelled like a man who spent his days chopping wood in the forest. He probably wore a red and black wool plaid shirt and a soft leather brown belt. A very powerful musk that had me daydreaming — I was single at the time. I dubbed this smell The Woodsy Man Smell. Socks I knitted with that wool dyed lichen, three years ago and through many washes, still have this smell. Since then I’ve been determined to find these colorful pigments, and I started to explore the world of lichens, learning about many species. 

The color purple has been obtained through dyeing with lichens for thousands of years. Some of these lichens include Ochrolechia, Lasallia, and Umbilicaria dating back to the Bronze and Iron age.  Harris Tweeds, a very established and well known Scottish textile company still in business today used (uses still?) Lichens in their famous tweeds. 

What are lichens? They are a mutualistic symbiosis. The plant body (or thallus) consists of two quite different organisms together in an intimate association; a fungus and a microscopic green plant (an alga). The fungus makes up the bulk of the thallus and the algal cells are buried with in it. Or rather, imagine the fungus saying the to alga, if you provide me with food, I’ll provide you with shelter.

Do lichens need a mordant for dyeing?
Lichen dyes are substantive, meaning no mordant is needed. All Lichens contain acids that hold precursors of colors. Some lichens have certain acids that give more dramatic colors than others. But all can be used for dyeing and none need a mordant. However, a number of additives can be used to shift the pH to achieve a different color. These include, but aren’t limited to: chalk, vinegar, ammonia, urine, washing soda, iron, onion skins, rhubarb leaves, copper pennies. Experiment and see what happens. 

Collecting
When collecting lichens, please be mindful. Lichens take a very long time to grow. Two things to remember; Collect from a spot where there is a plentiful amount. And only collect the lichen when it already separated from its substrate.

Dyeing methods
For dyeing with lichens, three different methods are used according to the desired color: 

BWM- simply means “boil water method”. Throw some lichens in a pot and boil away. A method I’ve used many times. Maybe add fiber with the lichens, maybe strain off to use later. The range of colors will be browns, yellows, oranges, and rust.

AM- “ammonia method.” This is key for the pinks, reds, purples and blues. There are certain lichens containing these colors that will yield these colors when fermented for three or more months with a 1:2 ammonia and water ratio.

POD Through reading, it is my understand that the letters POD stand for “Photo Oxidizing Dyes”. In Casselman’s research, she has traced their use back to the 18th century. But what happens with these POD dyes? What I’ve read in a few places, is to collect a common orange/ yellow lichen such as Xanthoria, found near the sea on rocks, preparing the same way as for AM by making a fermentation vat and let sit for the same length of time. Here’s the fun part: it reacts similarly to indigo in that when you pull the fiber out of the bath, it will be purple or pink. Expose it to sunlight and it will turn blue. And here’s the other similarity to indigo: return it to the bath for another 30 minutes or so, for a deeper pink or purple to return, then expose it to sunlight again and the blue will deepen. 

Some more detailed info on Xanthoria parietina: The fungus protects the green alga from the harsh UV rays and drought. In return, the alga provides nutrients to the fungus through photosynthesis. I know that lichens are made up of a symbiotic relationship, but is this situation with photosynthesis and UV rays unique to Xanthoria? Possibly, because this is the only lichen species that I know of where dyed colors change with sunlight. 

The Bleach Test
Not sure if what you’ve spotted or collected has red, pink, purple, or blue potential? Take a very small piece of the lichen and scrape or tear across the piece to expose the inner white flesh. Carefully pour bleach into the cap on the bottle, then dip the exposed lichen edge in the bleach. If it turns pink or purple or red, it contains the acids to yield these colors.

Prepare Fermentation Vats (AM & POD)
Collect a few tablespoons of lichens such as Evernria, Umilicaria, Xanthoria. Put lichens into a glass mason jar with an airtight lid. Have the ammonia ready — household or industrial-strength ammonia is fine, as long as it’s non-sudsy (I’m not sure why.) 
Fill the jar a third full with ammonia on top on the lichens. Close the top and shake. Open back up and fill with 2 parts water, leaving space at the top for aeration. If you tolerate ammonia, use 1 part ammonia and 1 part water, making a 50/50 solution. Close the lid and shake vigorously. Within minutes you’ll see the color shift. Shake the jar every day for at least three months. If you think of it, take the jar outside, remove the top and expose the jar to air. It will help to develop the color. However, if it is Xanthoria, do not expose to sunlight as it may shift the vat color. Put a label on the jar with the date, location collected and the species. 

For the dye experiment I conducted on Monday, the lichens I used were:
Lobaria pulmonaria. Also known as Tree Lungwort, favors oaks but could be found on a beech tree if near water, and growing on the south side of the tree. At one time this lichen was prepared as a jelly and given medicinally to those suffering from pulmonary affections (liver infections). It has been used in England, Scotland and Ireland as a dye to achieve yellows and auburns. The acid found in Lobaria is Lobaric acid. I collected a small amount of this lichen while in Prince Edward Island this past November. I set up the fermentation vat, although I had done my bleach test and no color appeared. I wasn’t convinced, and thought I’d try this anyway. Judging by the results of the pale apricot, I should have stuck with the simple BWM. However, I found the vat exciting and promising.


Umbilicaria pustulata  also known as rock tripe. Grows on rocks in upland areas in high altitudes. It contains gyrophotic acid. It has been used as a purple and red dye for thousands of years, mainly in the northern hemisphere. I first gathered a small amount from a boulder on Squam Lake last September. where I had been teaching foraging and natural dyeing with the Taproot Gathering. After a lively lichen conversation with Stephanie Pearl McPhee on the first night, she encouraged me to look for Umbilicaria pustulata, calling it black potato chips growing on rocks. I then knew I had also seen it on a trail near Bethel, Maine, one of my favorite spots. When I got home, I prepared the vat, and it’s fermented since September. 

Photo below: preparing the dye bath, I poured off a small amount from the fermentation vat into a clean jar.

Xanthoria parietina also known as Golden Shield or common golden lichen. I’ve read in a few places that it’s a weedy lichen as it’s so common. But still, I feel it should be collected with reverence as with all lichens. It contains the acid parietin. I first collected this lichen while in Ireland last spring and summer. My husband and I were on our honeymoon and we travelled to the Giant’s Causeway in Northern Ireland. We wandered off the beaten path to get a closer look at the water and to daydream of Finn McCool outwitting the Scottish giant, Benandonner and meeting up in the waters between Ireland and Scotland. There, I noticed boulders covered in a thick bright orange and yellow lichen. I collected about a tablespoon, sticking the loose yellow flakes in the pocket of my trousers. Several days later at our rented cottage, I tried the ammonia method for the first time. I grabbed an empty jam jar and the ammonia we bought at a garden store in town and prepared my first fermented lichen jar. Within minutes, the liquid inside the jar went from clear to pink, and deepened as the days went by, appearing like red Kool-Aid. As I waited for the color to shift I went outside to look out over the huge expanse that was our neighboring peat bog. I breathed the air and could smell the bog, lichens, and the rich freshness that Irish air is. I stepped back inside to look at my jar and I felt the familiar but rare sensation of sparkly sprinkles dashing across the top of my head. It's a feeling I've been experiencing for years when life lines up perfectly and I feel I'm smack dab in the middle of a magical energy.  

I’d read that I should open it up every day outside to aerate it so the color would develop. I also stuck a piece of hand-spun wool inside to just sit for a while. It dyed the wool pink without any heat, but eventually the color in the bath changed to brown. I was disappointed, but knew I couldn't keep the vat forever as we were returning soon to the US. 

Then we took a short trip to Inis Meáin, the middle of the three Aran islands off western Ireland. We had a glorious time! I found more lichen to collect in an unexpected spot. This time I kept it wrapped in a handkerchief to be prepared when we had reentered our US lives at the end of that month. 

Once prepared, that lichen fermented the longest. I then noticed we have the same-looking lichen here on Peaks and in Portland. I collected about a teaspoon near the Portland ferry landing, on the Eastern Prom, and also at a cemetery on Peaks, where I had a pleasant conversation with the groundskeeper about lichens. He was delighted to hear that I wanted scrape lichen from the headstones, because every year he, along with many others, uses a certain treatment to clean off the headstones to preserve legibility. Imagine a family member who wanted to locate an ancestor but couldn’t recognize the headstone because it’s covered in moss and lichens. However, on the flip-side of this, Lichenologists have been working to preserve cemeteries where lichens grow so as to keep the headstones from being cleaned as it offers a valuable resource in studying these delicate microsystems. A fellow natural dyer just sent me this link on the subject. Thank you Alissa!

By the end of the summer I had prepared about 4 very small glass jars containing all the same lichens from various Maine (and one Ireland) locations.

Let’s get dyeing!
You’ve prepared your vats (fermenting jars) and they’ve been ripening for months and you’re ready for this next step in discovering the world of colors that lichens keep. 

I strongly suggest you use a very small amount of fiber for the strongest color, an ounce of less of whatever you like: wool, silk, alpaca, etc, to start. 

This is really important: pour off only about a cup’s worth of the liquid pigment. Then pour that cup into whatever dye vessel you’ll use. If I’m dyeing a small sample, I create a double-boiler method with a mason jar in a larger pot. The pigments that come from lichens go such a long way — you do not need to dye with your entire fermented jar at once. If you did, it would be very wasteful. In the beginning when you collected your small tablespoons and you prepared your fermented vat, it wasn’t very much, was it? Perhaps you wondered what you could dye with only that amount of liquid? Well, the good news is that with lichen dyes, the pigment stretches wonderfully. 

Put in your scoured and pre-wetted fiber in the pigment and cover generally with water so that your fiber can swim freely.

Heat slowly and watch the temp so that it doesn’t get hotter than 180 degrees Fahrenheit. Heat for 1 to 2 hours, then turn off the heat and let cool slowly. 


Results:
Xanthoria fresh out of the jar, I brought it outside in the sun to let the UV rays (though very weak this time of year) do their magic in turning this pinky purple blue with photo oxidizing.  


However after almost an hour nothing happened. 

I set it in the window for an entire day and nothing changed... 
The light yellow/ apricot is from the Lobaria. 
The middle pink purple is Xanthoria after a day in sunlight. 
The garnet/ wine color is Umbilicaria.
Each small skein is wrapped with a strip of silk I also dyed in the jar. 

The second day I dropped in another sample skein into the Xanthoria and Umbilicaria jars for another go. The top two skeins are from day 1. The bottom two skeins are from day 2. Surprised to see the Xanthoria even deeper. Maybe come summer with stronger UV rays, the skeins will shift to blue? 

I did not wash any of these skeins or even rinse them. Washing with soap can alter and shift colors because of the ph levels in whatever soap used.

I had such a fun time with these experiments and will of course be going further. Later on in the year as I travel to other parts of the country, I'll be collecting lichens where ever I go. This has turned out to be one of my favorite parts about traveling to new places. It's also a great way to explore a new place and create memories.

Wanting to understand lichen ecology, I'll be attending a seminar later on this summer where I'll be using a microscope, small knife and going on walks. I couldn't imagine a more exciting way to spend a week in Down East Maine in June. I look forward to using what I learn that week in future foraging and dye classes. 

Recommended reading list:  
The Observer’s Book of Lichens by K.A. Kershaw & K.L. Alvin. England 1963. For me an amusing little book. A bit out-dated as sometimes species are renamed. I found this in my favorite bookstore, Charlie Byrne's in Galway City, Ireland last spring. I’ve been visiting this bookshop on every trip I make to Ireland. My favorite lichen, Xanthoria parietina, is on the cover of this book. And I enjoy reading it with a 70 year old British male voice in my head. 

Lichens for Vegetable Dyeing by Eileen Bolton, England 1960. A gift from a fellow fiber enthusiast and student I’ve had in a few dye classes. She rescued the book from a rubbish pile. I was delighted to be the new recipient. It has a few beautiful plates and is an easy read. 

Lichen Dyes: The New Source Book by Karen Diadick Casselman, 1996. This book is what I’ve been using the most, and what I highly recommend —mainly because it’s one of the only ones out there that I know of. In the book, Casselman answers all the questions about lichen collecting, from ethics to colorfastness. 

Casselman also published a document in regards to dyeing with lichens and mollusks called The Politics of Purple. 

If you have any questions, of what to share your results, I'd love to hear from you,  leave me a comment:)

Happy experimenting!

ox, r