Monday, March 17, 2014

Happy St. Patricks Day; a natural rainbow dye tutorial

When I was very small I used to say that Rainbow was my favorite color. 
Or depending on how I felt, I'd also say Clear. 
I was fascinated with both features that I found in my paint box, my barbies' clothes, my Rainbow Bright doll and the stuffed butterfly I had. 

Also since I was small, I always associated rainbows with Ireland and Ireland with rainbows. 
The first time I actually saw a rainbow in Ireland,
 I was experiencing The Burren for the first. 
Seeing those magical colors soar up and through the grey blue sky over Kinvara, 
the world around me was illuminated even further. 
Standing at Dunguaire Castle with the other tourists, 
gazing out over Galway Bay's low tide. 
I swear the seaweed rose up and sang with happiness because it was practically glowing. 

Sigh... I knew I was destined to return to that area. 
And I did 3 more times.
But more on that later. 

One day last week, I played around with color blending with my natural dye powders 
to create a rainbow self striping yarn for one of my up coming 
And a sampling of the rainbow spectrum
using only 3 dye pots that featured the 3 primary colors. 


I used:
and 


After I dyed up my samples for the knitting class example Judy has made,
I played around with creating a rainbow self striping skien. 

I love how it turned out! 

I'll try and lay out the basic movements I did to achieve the secondary colors.

for the rainbow skien:
Pictures it: your yarn wrapped in a skein. Eyeball it in thirds. 

Start with indigo 
(because in my experience with the vat I have going- it has rite color remover in it which is the same as theoria dioxide- If I dye fiber in another color first and then dip in this indigo vat- it strips the color and then adds indigo.... not my idea of a good time)

So with that said- I always dye with indigo first. 
I dipped a third of my skein in this first. 
I left it for about 15 minutes. 
I pulled it out holding it with the blue downwards and let it drip in the pot for a few minutes as it oxidized from white to yellow to green to blue.
I then gently squeezed the yarn so it wouldn't drip in the next pot. 

I then placed another third in the madder root pot AND set up another small pot right next to the burner with a jar inside- just trying to create a sort of stand. You can use anything though. 
It's important to let the yarn NOT in the dye pot be higher up than what is in the dye pot. 
Otherwise, water will travel up the yarn and find the outlet, pouring all over your stove. 
I also let 1/3 of the blue soak in the madder bath to create purple. 
I had let the yarn sit in the madder for about 20-30 minutes before I pulled it out. 
Again, I gently squeezed only enough to not let it seep into the osage which was my next step.

With the osage, I dipped both the remaining undyed 1/3 AND 1/3 of the other end of the blue- to make green and 1/3 of the madder that was right next to the osage into the osage to create orange. 
One might think this takes a bit of math- but I like to think it takes visualization.

When all is said and done with this dyeing portion, you will end up with;
1/6 red- (madder root)
1/6 orange (osage + madder)
1/6 yellow (osage)
1/6 green (osage + indigo)
1/6 blue (indigo)
1/6 purple (indigo + madder)

You can use many other blending variations to achieve the tones that you like most. 

I'm excited to continue my experimenting with these pigments. 
Many of these results will be for sale in my etsy shop. For example :) 

Alternatively, if you want to create a single color like green, orange or purple with your natural dyes,
follow the color combos above or create your own with whatever makes those same colors. 
For example, you could use indigo + fustic to create green. 
Logwood grey + osage or fustic to create green, 
and so on. 

As far as that magical rainbow skein, I re-skeined it to shuffle my colors:) 
A fun trick to apply to any of your hand painted, dip, space, or vat dyed yarns. 

Thanks for reading and please let me know if you have any questions or comments by leaving a comment here. 
I love hearing from you. 

Sláinte!


Saturday, March 8, 2014

An Anonymous Red Weed in My Dye Pot

I know it's been TOO long since my last dye tutorial. 
I had set a goal (that I was really enjoying) of dyeing at least once a week and posting a tutorial for you. It's amazing to me how doing something out of my normal routine had flip everything on it's head. 
This thing that got me out of my dyeing routine was a really good thing though. 
One of my favorite things to do with my husband. 
We visit his family and friends and I get to smell fresh things growing 
that I can't smell here in Maine in February. 
Ok so that was almost a month ago now 
and between the jet lag and tending to other things 
including my husband and I spending a lot of time rethinking our food habits-
we both participated in a 4 day liver cleanse to help reset our bodies. 
It was very effective and I may chatter about it here and there. 

With this New Year, 
I set a few goals for myself 
including mapping out 
and scheduling my creative time. 

That includes spending more time with my dye pots 
and plants studies. 
I don't know about you, 
but I can get side tracked- 
by anything so easily. 

Before I know it, the day is over 
and I haven't created or accomplished anything that I wanted to.
So, when I can, all my thoughts and ideas that I have 
when I wake, just before bed, in the shower, on walks, mid day- when ever, 
I try and write as many of them down. 
Then I revisit these scratchy lists 
and map out how much time I'll need and any materials I need to fetch or prepare. 

I then write it all down with a pencil on a tangible calendar- my iphone is useless for this exercise because I want to see everything at once. 
I can't tell you what scheduling these creative activities has done for me. It feels so good to plan and keep me pointed in the right direction. 

I knew I wanted to get back to my dye tutorials 
but like I can do so easily, 
I get distracted by everything else around me that needs to get done. 
Plus, since we returned home, I didn't have a good creative plan in place where I could just pick up.
I had to start from scratch.
And I was distracted by several household items to clear out. 

I was also having trouble deciding what to dye up next. 
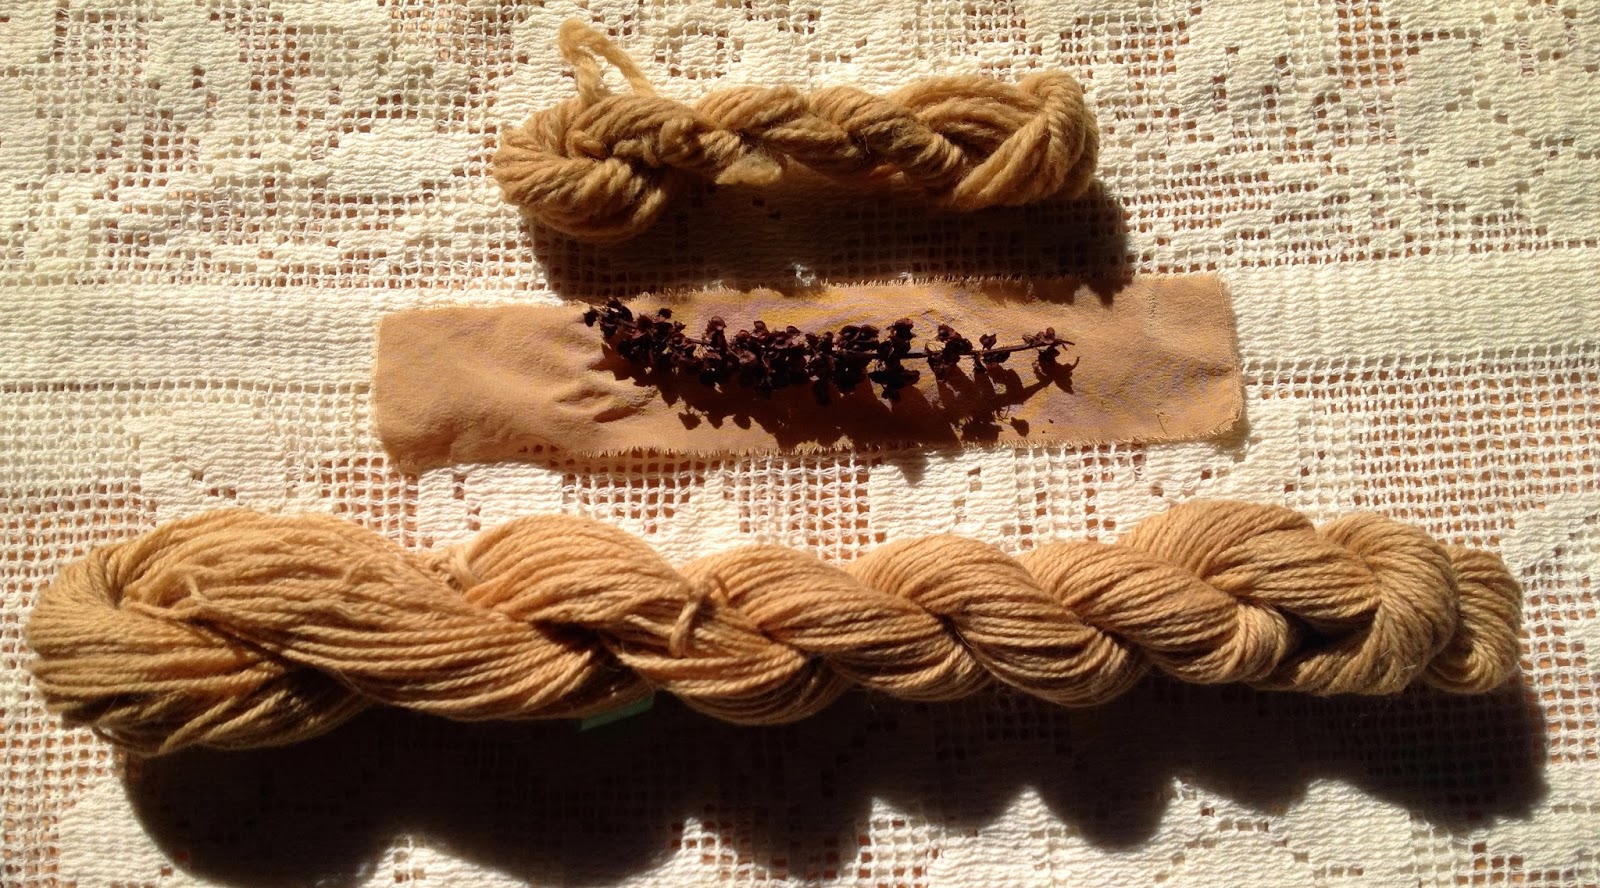
While clearing out the mudroom, I came across these nameless red weeds
that I found in the organic apple orchard last fall. 
I've looked in books and the internet and I cannot figure out what these tall rusty red weeds are
but
I used them anyway. 


As they were steeping away in the water, slowly heating up, I noticed these beautiful seeds peeking through like tiny bright red pin pricks. 
I hadn't noticed them when I picked the plant last fall. 

The dye bath was a golden color. 
Normally, I may have let the fiber float around with the plant because I really enjoy the color variation that occurs when plant is touching fiber as it cooks away. 
But I knew with this plant it would be a disaster to get all those fine seeds out of my fine yarn.

I let the small strip of silk swim in there with the plant materials. 
After a few hours of simmering, I used my fine mess strainer and removed the plants saving the bath. 
I then put in my yarns and let it simmer away for about an hour. 
I did add a tiny bit of alum to the dye bath and cream of tartar- after it was cooking away. 


The first skein on the top is 100% wool
the large skein on the bottom is a blend of merino, angora and silk (!)

I may dip this in an indigo vat to create an earthy green
an logwood bath for an EVEN earthier green
or
my madder/ cochineal after bath for an earthy orange. 

*Remember*

in your dye experiments, when you get a result that your not impressed with, dip it into something else for over lapping colors. The depth of color we are able to achieve through natural dyes is (in my opinion) something that cannot be obtained with acid dyes. 
The pigments in natural dyes, to me, are still alive and this is the very reason why I LOVE using them. 

I think next time, I'll collect this plant and try an eco print. 
For all you natural dyers out there who also love to collect plants, 
I highly recommend playing with this method. 
It is fun and magical 
and gives a whole new definition to natural dyeing. 

Last night I unfolded 6 prints I put together while on my last trip to SF.
I was tickled with the results but I was hoping for more.
Later today I'll be adding to them and will share pics later :)

Stay tuned for next week when I post a natural rainbow dye tutorial
for St. Patrick's Day. 
<3 nbsp="" p="">

p.s. if you know the name of this weed, please share in the comments:)


Tuesday, February 18, 2014

Peaks Island Fiber Arts Camp 2014

This New Year, for me has begun with thinking about cultivating innovative ways that reach further into the realm of both independent and collaborative creative endeavors to bring my love of fiber, plant dyes, and teaching into new territories.

Over here on Peaks Island, there is a really talented Textile Artist who also works with plant dyes and creates beautiful felted cloth. I've had the wonderful pleasure of getting to know Laura and we spend a lot of time talking about textiles and drinking tea. I'm really grateful for her friendship. She's also the co-fonder of the Peaks Island Fiber Arts Camp that she has been running with her friend, Susan Hanley, for a decade now, also a fellow islander and textile artist.

Several weeks ago, I asked Laura if they might need any help this year. As it turned out, Susan had just let her know she'd like to take a sabbatical for 1 year. So, for this year, I have the pleasure of stepping in for Susan. Laura and I got down to it and have worked really hard meeting about every week to create these 4 camp offerings for children ages 6-14.

Enrollment is now open.

 :: Early Summer Days :: 
whittling, creature making and mud oven granola baking

Spend the early days of summer relaxing with 
new friends and a project or two. We’ll whittle
a walking stick and knitting needles - visit
beaches and share stories. We’ll make a 
piece of fabric from which little animals & 
creatures will grow. And we’ll heat up the mud 
oven and bake delicious homemade granola. 
June 23-27, 8:30-2:30 ages 7-12, $285

**********************************************
:: Fabric Collage ::
Matisse, wool, silk, and collage 

Create a beautiful light and colorful collage. 
Using Matisse’s Cut outs as inspiration 
campers will create their own colors, shapes, 
and patterns with silk cloth. We’ll experiment 
with designs and lay-outs. When all the pieces 
of the collage are ready they will be held 
together, not by sewing, but by felting.
June 30-July 3, 8:30-2:30, ages 8-14, 4 day camp $235

**************************************************

:: Still Life and Lunch ::
drawing, painting, and baking

Fruit salad, bread, blueberry hand pies, pizza and more. 
We’ll spend the first part of each day drawing and painting 
the day’s ingredients. 
Then we’ll work together to prepare
the recipe of the day. 
Finally we’ll enjoy the good food we’ve made. 
On Friday we’ll sew together a book 
of our drawings and paintings 
and possibly include our recipes.
July 21-25, 8:30-2:30 ages 6-14, $285

************************************************

:: Bugs, Tracks, and Crafts ::
explore, inspect, and stitch

Follow the paths of snails, bumbles, and hermit crabs 
while we explore the beach, garden, and forest 
for these tiny creatures. 
We’ll inspect their tracks, habitats, and nests. 
Then using various textile textures, techniques, and our imagination, 
we’ll create unique keepsakes 
capturing the nature of 
these tiny creatures.
August 18-22, 8:30-2:30 ages 6-12, $285

*********************************************
About Laura
“I’ve been making things my whole life - sculptures, clothes, prints, books, and mud ovens. I’m thinking of building a cob cottage someday, but until then I’m busy felting, dyeing and sewing. Each summer I’m glad to share these arts & skills I find so valuable”. 

About Rachel
“Working from my studio here on Peaks Island, I love using oils and watercolors to study botanicals, and foraging wild plants to dye my hand spun yarn. I keep myself busy knitting, sewing, weaving,
felting, blogging and teaching both on island and around New England for my small business, 
44 Clovers”

We're happy to answer any questions:
Rachel (that's me) at: 44clovers@gmail.com
or Laura at: lrglendening@gmail.com

To enroll your child(ren) contact either Laura or myself and we will email you a copy of the brochure where you can print out the registration form to mail in. 

Looking forward to seeing you this summer!


Thursday, February 6, 2014

A Series of Natural Dye Collaborations; with Portland Textile Businesses

Something I'm super excited about:
My new Natural Dye Collaboration Series with Portland Small Businesses. 
Starting in February I'll be starting a series of natural dye collaborations with 
and


Each class will be a two parter starting with learning how to use natural dyes for a particular textile form at Portfiber. The second day will be using those dyed fibers to create a unique project at one of the three shops. 

First up:

Natural Dyeing for Weavers
March 15th and 22nd 
Portfiber
Day 1: at Portfiber, we'll learn dye techniques for yarn and dip dye methods taught by me
Day 2 and (maybe) Day 3 also at Portfiber, weave your project-  taught by Dana Fadel

this was a really fun class. Here are the yarns just after dyeing:

I can't wait to get started on my tiny loom. But right now, my husband is in the middle of his first weaving project- so that's a good thing. I'll let him take his time:) 


****************************************
Natural Dyeing for Knitters
April 19th and 26th
Portfiber and Knitwit


Day 1: at Portfiber, using quince yarns, we'll learn fun color mixing techniques to create just the bright colors we want using just 3 plant dyes (plus black walnut for the back ground color). 
Day2: Judy over at Knitwit will guide you through a fun fingerless mitt project using all your beautiful color samples. 

***************************************
Natural Dyeing for Sewers
Date TBA Late May- early June.
Portfiber and Z Fabrics
Day 1: at Portfiber using lovely silk fabric from Z Fabrics, we'll set up bundles to dye and play with Shibori techniques.

Day 2: over at Z Fabrics with Anne Riggs, you'll create beautiful edgings with a hem stitch and whatever else you'd like on your fabric.

****************************************

June 14th & June 21st (we've been rescheduling this a few times in order to get enough signups) 
Portfiber
Day1: we'll learn techniques for hand carding and dyeing rologs 
Day 2: needle felt your favorite song bird and learn how to create tiny details

Both workshops will be taught by me. Follow the link above to sign up.


As we all work together to tie up the details, I'll continue to update this post. 

If you have any questions, send me an email or leave a comment below. I'd love to hear from you. 

ox! R


Wednesday, February 5, 2014

A day with my mushrooms; dye experiments

I've been collecting road side plants for a while now. Always curious about the little inconspicuous plants that jump out at me on my walks.  

This past summer while walking up from my first swim at Medomak, I spotted along the side of the woods, two large bright orange- things popping out from the leaves. 
At closer look I notice these bright growths are mushrooms. 
Something happens when I find a new mushroom, lichen or plant where I don't know it's potential yet. I become a crazed person, stopping everything, using what ever I have on my person, shirt, skirt, (in that moment) towel that I usually wear around my middle after swimming to cover parts I don't care for others to see. Like my glow in the dark thighs. 
But once I saw this orange- time stopped and I stopped thinking of my whiter than pale thighs. I was more happy about my weird mushrooms. 
After some investigating, I found it was the lobster claw mushroom. Also known as
 Hypomyces lactifluorum. Dyeing with this fresh mushroom and adding ammonia to the dye bath, our yarns came out a light salmon pink. I was pretty excited about it. As the summer progressed into fall, my mushroom foraging grew to such an obsession. I spent a lot of time in my sister's new woods in Bowdoin where my two small nephews and niece helped me collect, filing my basket full of every mushroom they found. 

Back home I sorted each batch, cutting them into tiny pieces and letting them hang out outside to dry or in my basement. I did invest in an inexpensive dehydrator to help get the job down quicker. It speeds up the process for drying. Drying the mushrooms is essential for storing for later use. 

This week I knew would be the week to go through my stash. Over this past year I managed to stuff TWO plastic grocery bags FULL of dried foraged mushrooms. All labeled with the date, location, and if I was able to identify it- the name. If not- I made one up. But you know, it just feels better to know with out a doubt what a mushroom is. I still need to find a good mushroom book. 

After I decided on which ones to work with, I weighed each pile, in grams, made notes, put them in a mason jar, filled with boiling water, placed in large lobster pot filled half way with water. I made a little note of which mushroom on a piece of masking tape, stuck it on the end of a wooden skewer and put it in the jar. I love to multi task and I don't feel normal if I'm not multitasking, but I also can't hold all this info at the same time. I have to write things down. Also, having these notes is always good for comparison later with each dye test. 

Measuring out & grinding hard black puff balls. 


Red gilled cort bath- beginning

Lobster claw bath

First look at red gilled bath!!!

From left to right: a type of black hedgehog, 4 baths of lobster, 2 of red gilled. All in process. 

A few days before the mushroom dyeing, I mordanted several small sample skeins of 100% wool and small strips of silk fabric. In each jar went a strip of silk and a skein of wool yarn. 

Bright spots in a sea of beige. 


When I'm dyeing with a plant for the first time and I'm waiting and I'm exited to see the color result, I've had to teach myself not to really "look" at the color until it's all done and dried on the fiber. 

Mushrooms I dyed with: (if it has a * I made up the name because I can't figure out what it is yet)
Red Gilled- 5g
Lavender (looks like cortnilius)8g
hard black puff balls 5g
hedgehogs- black 23g
phalis 12g
cort 2g
lobster claw 2g
polypore 19g
Nov- mushroom 35g
thelephora terrestris11g
tiny soft puff ball 5g
white fungus with pink edges 41g
tiny orange hedgehogs 2g
turkey tail 14g
pail turkey tail 20g
small poly pore 20g

I knew the red gilled and the lobster where absolute givers of color- the others where blind experiments. 

Those two mushrooms- the red gilled cort and lobster where just stunning. STUNNING! STUNNING! STUNNING!
It's official. Though red gilled is wonderful, the 5 grams I used only lasted through 4 dye baths where the 2 grams of lobster claw mushroom lasted through 6! The first dye bath of lobster with just alum was bright orange. I then added ammonia for the next dye baths and lovely pinks. 

Have you dyed with mushrooms? Share your stories with us here!

About to board a plane to San Francisco where I'll have 8 days to explore Califonria's spring and budding flora and fauna. 
I've got collection bags & silk fabric packed for creating Eco prints! So excited to discover more dyes plants!

If I remember to, I'll post to FB at 44 clovers, Pinterest and Instagram my findings along the way:) 

Happy Weekend!

Sunday, February 2, 2014

Cochineal; a dye tutorial

Last week I worked with some Maine raised Shetland wool and cochineal liquid extract. When I want a bright red, I always go for cochineal and cream of tartar. With cochineal only, a lilac/ mauve will appear. When you add cream of tartar, it shifts the color to bright red- sometimes more pinky red if not enough cream of tartar is used. Though this day, I wanted purple. If your curious about cochineal, you can read more it here. An interesting insect, the cochineal beetle has a stunning history going back to before the Aztecs. 

1st dye bath.

left- 1st dye bath of shetland wool. right- teeny skein and vintage silk hankie dyed with cranberry. You can read more about that tutorial here. 

1st dye bath.
2nd dye bath. 

In person, the lighter color is more pinky like in the above picture than in the bottom picture. 

Want to try this at home? 

This is what you need:
stainless steel pot
large stainless steel spoon of stirring utensil 
stainless steel measuring spoons
kitchen scale
natural fiber
ph neutral soap
alum
thermometer 

*for alum, you'll use 6% of W.O.F. (weight of fiber)

Prepare your fiber: 
Weigh your dried fiber in either grams or ounces- whatever works for you. Then write it down.

Clean your sink really well, or use a basin and fill with very hot water. After water is done running, add a touch of soap. Don't let suds form. Let soak for at least 30 minutes or longer. 

(if soaking for only 30 minutes- when you prepare the dye bath, do so with the same temperature water as the soaking bath so that the fiber will not be shocked.) 

Prepare your dye bath: 
Fill your stainless steel pot with the same temperature water as your soak bath.
Look at the note you made for the weight of fiber- multiple by 6%- this is how much alum you'll use.  

weighing the alum in grams is sometimes easier here as it's such a small amount. If it's easier for you, convert into tablespoons. This is what I do sometimes as it's just easier than weighing. 

Another helpful hint that I like to use: Use 2 Tablespoons for every pound of fiber. 

Dissolve alum in boiling water and add to pot. Then weigh out your cochineal- depending on the color- add a few tea spoons and experiment- take notes on what you add so that you can duplicate it again if you want to. Add to your pot- and stir. 

Add your fiber and set heat to medium to allow heat to raise slowly. 

Don't let your fiber go over 180f so keep a close eye on it checking with your thermometer about every 1/2 hour. Each time you check, take your large utensil and make a big stirring motion so that you bring the bottom fibers up to the top. *if you don't do this- your yarn will dye unevenly* 

Once it's cooked for 1-2 hours, turn off heat and let cool in the pot into the next day. 

Washing your fiber: 
The next morning (this is my favorite part) your fibers will be cooled and you can reach right in and pull out your fibers. Set something up so you can let your fibers hang and drip into the pot- catching extra dye to save for the next batch. 

When it stops dripping- and feel free to keep squeezing the liquid into the pot. Once dripping has stopped- fill up the sink or basin with cool water and only a teeny bit of neutral soap- again after water stops running. 

Let your fiber soak in the cool bath for again about 30 minutes. This will help remove any extra color sitting on top of fiber- it shouldn't alter the color at all. It will also keep fiber soft. 

2nd Dye Bath:
You will probably have more dye left over. This will give you another round of beautiful color. It will be lighter- but offer more tonal depth to your projects. 

Follow through with Preparing your fiber. 

I'd love to see how your cochineal turns out, feel free to share here with any links. And let me know if you have any questions!

oxox, Rachel

p.s. if your interested in purchasing this yarn for your projects, you can find it here.